Tuesday 26 July 2011

Matar Paneer

Another recipe from Sailu's Food. This is probably the most cooked dish in our house from her blog. P is in love with the dish. I made it for one of our friends and she loved it as well. This is another proof that you just can't go wrong with her recipes if you follow them right.

We eat it with rotis and rice.


The very first time I made this dish, I didn't have a few ingredients (Kitchen King Masala, Kasuri Methi and Cream) but it still tasted good. But with all the ingredients, it tasted just perfect.

Since we make this regularly, we avoid the cream. We use cream only when we are expecting some guests.

Without any more blabbering, here’s my version of the recipe:


Ingredients
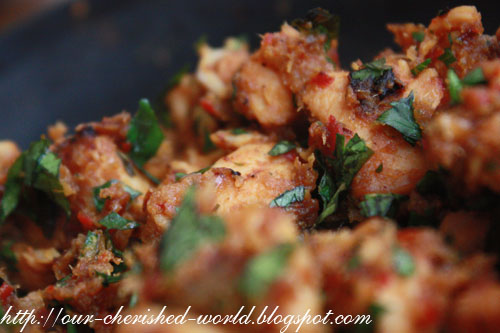
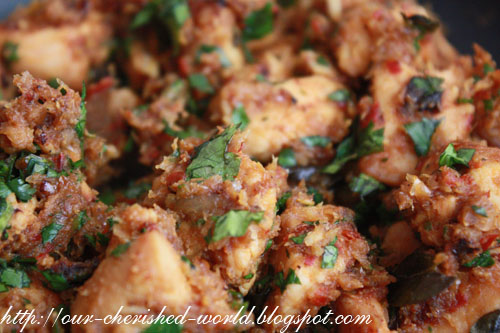
250 gms Paneer – Cubed
1 cup Frozen Green Peas
1 Large Onion – finely chopped
2-3 Green Chillies – finely chopped
3/4 tsp Ginger Paste
3/4 tsp Garlic Paste
1 Tomato – Finely Chopped
1 tsp Red Chilli Powder
1/4 tsp Turmeric Powder
1 tsp Coriander Powder
1 tsp Kasuri Methi (Dry Fenugreek Leaves)
1/4 tsp Garam Masala Powder
1 tsp Kitchen King Masala Powder
1 tsp Cream
2 tbsp Oil
Salt to Taste
Chopped Coriander Leaves for Garnish.

Method
  1. Heat Oil in a pan. Saute the Onions and Chillies till the Onions turn translucent.
  2. Now add the Ginger and Garlic pastes and fry till the raw smell goes.
  3. Add the Turmeric Powder, Coriander Powder, Red Chilli Powder and mix well.
  4. Add the tomatoes and cook for 5 minutes - until the tomatoes are cooked well.
  5. Take a hand blender and grind to a coarse paste.
  6. Add a cup of water and bring to a boil.
  7. Now add the Peas and Paneer and cook till the Peas are done
  8. Now add the Kitchen King Masala, Kasuri Methi (crush this between the palms of your hands) and Garam Masala and mix well.
  9. Turn off the heat and add Cream and mix.
  10. Garnish with Chopped Coriander Leaves and serve with Rice / Roti.

This goes to the following events:

Radhika's Let's Cook - Subzis


Jayashree's Healthy Lunchbox Ideas - Paneer that was started by Kalyani


Priya's Bookmarked Recipes - Every Tuesday - 26th July 2011(Volume 51)

Thursday 21 July 2011

Simple Chicken Fry

This was my favourite sunday dish. Sunday used to be the "non-veg" day in our house. There were 2 types of chicken made. One was Chicken Pulusu (gravy dish) and one was Chicken Fry.

I never liked pulusu back then. I am not sure why. So Fry had to be there for me. My brother and father liked pulusu, so it was pulusu for them. Not that they did not eat my fry. :(.


When I go back home, this is still made for me. :). I love it. I was really missing it when I came to UK. So I called my Pinni (mom's sister) and took the recipe. Its the first non-veg dish I prepared. I am not totally sure why it took me so long to blog it though. Just lazy I suppose... Or maybe i never had the patience to click photos... Had to eat it right away.

So this time, I clicked right in the dish I made it in - as soon as I turned off the heat. Can you see the smoke rising up???


Ingredients
For marination:
1/2 KG Chicken - boneless, cut in small cubes
1/4 tsp Turmeric Powder
2 tbsp Curd
1 tsp Red Chilli Powder

For cooking:
3 Medium sized Onions
5 Dry Red chillies
1 inch Cinnamon
2 Cloves
1 tsp Ginger Paste
1 tsp Garlic Paste
1/4 tsp Garam Masala Powder.
2 tbsp Oil
Salt to taste
Handful of Chopped Coriander leaves for garnish

Method
  1. Marinate chicken with the ingredients for atleast 1/2 hour (preferably over night)
  2. Make a coarse paste of Onions and Red Chillies.
  3. In a pan, heat some Oil and add the Cinnamon and Cloves and fry for 2 minutes.
  4. Now add the Onion-Chilli paste and fry till it browns.
  5. Now add the marinated chicken.
  6. Mix well. Do not add water as the chicken will leave enough water.
  7. Cover and cook till chicken is almost done.
  8. Open and cook till you get the consistency.
  9. Add the Garam Masala Powder, mix well and turn off the heat.
  10. Add the Coriander Leaves and mix well.
  11. Serve as a side dish with some dal / rasam.


Monday 18 July 2011

Baked Falafel

This recipe has been in my to-try list for almost a year now. P was not a fan of chickpeas – that's what kept me from making this. His "liking" for chickpeas changed recently when one of our friends made this yummy chole. From then, he doesn’t mind chickpeas so much.

He’s also opened up to me trying out new recipes. With this combination, I had to try out this recipe that I had been "eyeing". I had found too many recipes for this. While some were too elaborate, some were too simple. I came up with the following recipe after keeping in mind that I need to feed V also the same thing – so it shouldn't be too spicy for him.

Chickpeas are high in protein. It is one of the sources of proteins in a vegetarian diet. The traditional Falafel is deep fried. Baking it is a healthier option.


Here's how I made this:

Ingredients
1 cup dry chickpeas – soaked over night and cooked
2 Green Chillies – Finely Chopped
1 cup Corainder Leaves – Finely Chopped
1/2 cup Mint Leaves – Finely Chopped
1 tsp Cumin Powder
1 tsp Coriander Powder
1 tsp Chilli Powder
1 tbsp Garlic Paste
1 tbsp Ginger Paste
2 tbsp Whole Wheat Flour (I used Atta)
1 tsp Baking Powder
Salt to Taste
Oil to grease baking tray.


Method
  1. Pre heat the oven to 200oC.
  2. Take all the ingredients except Oil in a food processor and pulse to a coarse mixture.
  3. Take a baking tray and grease with Oil.
  4. Make 12 patties with the mixture and place them on the tray.
  5. Bake for 40 mins turning once in between.
  6. Serve hot with a dip / sauce.

Note 1: I made 20 patties – that's why they are thin. I will be making 12 patties next time so they are thick.
Note 2: I didn't add the green chillies to the food processor. I took out a few patties for V and added the green chillies and made the rest for us. This way, V didn't find it too spicy. It was right for us too.

This goes to the following events:

Shobha's Cook it Healthy.


Harini's Only Baked that was started by Pari.

Wednesday 13 July 2011

Carrot Roti

Yes... My blogging has slowed down. I am trying to keep up and not let the blog "die".

The problem is, I need to wear my glasses when I am at the computer. That's not the actual problem. I've gotten used to it at work. But my son thinks they are sunglasses and wants to wear them. I tell him to wear his own sunglasses and that these are not sunglasses. He doesn't listen and he wants only my "sunglasses".

I decided its best not to wear them for sometime when he's around. And by the time he sleeps, I am too tired to think of writing anything.

But now, I thought instead of browsing around during my lunch hour, I'll try and do a write up sometimes. I just need to edit photos when I am at home before posting. Makes more sense, doesn't it? Not that I'll be posting everyday. But at least I can do some write ups now and then.

This recipe is again very subject to individual taste. Everything depends on how spicy you want it. I myself don’t stick to one recipe.


Ingredients
2 Carrots – peeled, roughly chopped and cooked well
1/4 tsp Chilli Powder
1/4 tsp Coriander Powder
1/4 tsp Cumin Powder
1/4 tsp Ginger Paste
1/4 tsp Garlic Paste
2 cups Atta (Chapati Flour)
Salt to Taste

Method
  1. Blend together the cooked carrots, Chilli Powder, Coriander Powder, Cumin Powder and Salt to a smooth paste adding water as needed. Make sure the paste is not watery.
  2. Take atta in a bowl and incorporate the carrot paste into it.
  3. Add water if necessary and make the dough.
  4. Let it rest for atleast 20 mins and make Rotis(Phulkas).
  5. Serve with any curry.

Note: I have learnt how to make Chapatis / rotis on my own. My guide has been Shilpa of Aayis Recipes. I've also seen some videos on You Tube. It just takes practice.


This goes to:

Reva's Veggie / Fruit a Month - Carrot that was started by Priya.

Thursday 7 July 2011

Back… with a simple recipe

Hi guys

I got back from the US about a month back but wasn't keeping too well. So I couldn't blog.

I've had migraines forever. Recently, they've been "visiting" me everyday. That's the reason I couldn't blog. I just didn't feel like looking at the computer once I got back. As it is I have to look at the computer all day at work.

The doctor put me on treatment. I also got my eyes checked. I am a bit short sighted now. So I started to wear glasses. Hopefully that'll take care of my migraines as well.

My parents left to India almost immediately after we came back from the US. Before they left, my mother filled up my freezer with her food. So I have yummy food for quiet some time. I do make food every evening though.

I am trying to get back into my routine. So hopefully, I will be back to blogging regularly.

Enough of all this. Let me get to this recipe.

Before I went to the US, I left my herbs with my friends to take care. I told them to use the herbs as and when they need them. They used the Coriander, but the Basil and Mint were "over growing" by the time I got them back.


With the Basil over growing, I decided to trim it and make some pasta sauce.


Here's how I made this simple sauce.

Ingredients:
1 Onion finely chopped
5 cloves Garlic finely chopped
6 tbsp Chopped Tomatoes
2 tbsp Oil
Handful of Chopped Fresh Basil
Salt to Taste


Method
  1. Heat Oil in a pan.
  2. When hot, add the garlic and sauté till it starts turning brown. Take care it doesn't burn. There's nothing worse than burnt Garlic.
  3. Add the onion and saute till golden brown.
  4. Add the tomatoes and salt and cook till the tomatoes are done.
  5. Add the Chopped Basil, mix well and turn off the heat.
  6. Blend to desired consistency.
  7. Serve with any kind of pasta.

The taste of fresh basil was absolutely delicious. There's nothing to beat it.